FastDFS教程
作者: 分类: 技术分享 发布于: 2023-04-14 18:26:52 浏览:2,492 评论(0)
FastDFS教程
lecture:wayee
一、FastDFS 介绍
简介
FastDFS是一个开源的轻量级分布式文件系统,它对文件进行管理,功能包括:文件存储、文件同步、文件访问(文件上传、文件下载)等,解决了大容量存储和负载均衡的问题。特别适合以文件为载体的在线服务,如相册网站、视频网站等等。
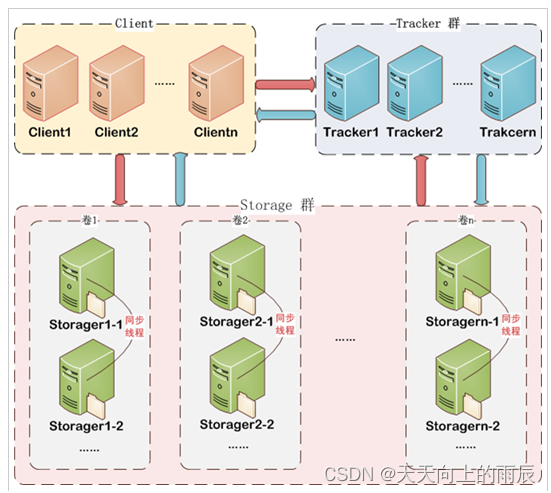
FastDFS两个主要的角色:Tracker Server 和 Storage Server 。
Tracker:跟踪服务器,管理集群,tracker也可以实现集群。每个tracker节点地位平等。收集Storage集群的状态。
Storage:存储服务器,实际保存文件,分为多个组,每个组之间保存的文件是不同的。每个组内部可以有多个成员,组成员内部保存的内容是一样的,组成员的地位是一致的,没有主从的概念。
应用场景
- 网络文件共享:可以在多个服务器之间共享文件,实现文件共享和访问。
- 图片、音频、视频等大文件存储:FastDFS可以管理大文件,实现文件处理和访问,适用于多媒体资源存储。
- CDN(内容分发网络):FastDFS与CDN结合,可以实现多地域、多节点的内容分发,提高访问速度和稳定性。
- 云存储:FastDFS支持横向扩展,可以扩展存储节点,支持云存储。
- 日志处理:日志是通常的批量文件写入,FastDFS可以有效地处理大量的小文件写入,适合用于日志收集与处理。
上传交互过程
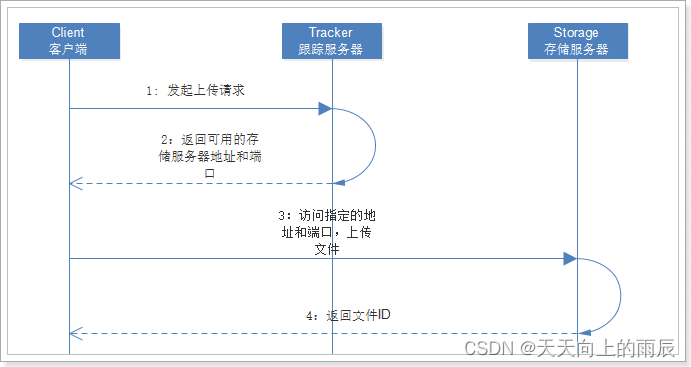
Client通过Tracker server查找可用的Storage server。
Tracker server向Client返回一台可用的Storage server的IP地址和端口号。
Client直接通过Tracker server返回的IP地址和端口与其中一台Storage server建立连接并进行文件上传。
上传完成,Storage server返回Client一个文件ID(卷、目录),文件上传结束。
下载交互过程
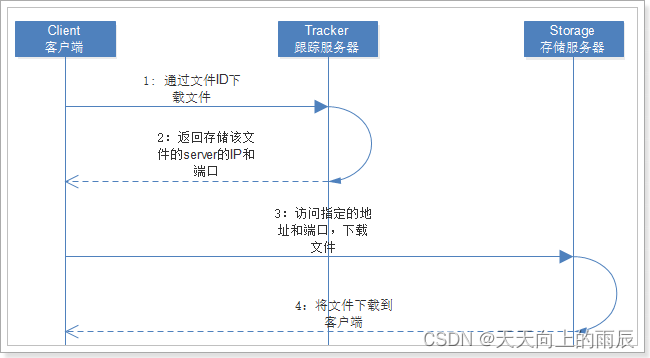
- client询问tracker下载文件的storage,参数为文件标识(卷名和文件名);
- tracker返回一台可用的storage;
- client直接和storage通讯完成文件下载。 需要说明的是,client为使用FastDFS服务的调用方,client也应该是一台服务器,它对tracker和storage的调用均为服务器间的调用。
二、安装
环境准备
使用的系统软件
| 名称 | 说明 |
|---|---|
| centos | 7.x |
| libfastcommon | FastDFS分离出的公用函数库 |
| libserverframe | FastDFS分离出的网络框架 |
| FastDFS | FastDFS本体 |
| fastdfs-nginx-module | FastDFS和nginx的关联模块 |
| nginx | nginx1.15.4 |
可以采用yum安装和源码编译两种方式之一。
yum安装
针对CentOS 7 和 CentOS 8及同类Linux发行版。 先安装FastOS.repo yum源,然后就可以安装FastDFS相关软件包了。
CentOS 7、RHEL 7、Oracle Linux 7、Alibaba Cloud Linux 2、Anolis 7、AlmaLinux 7、Amazon Linux 2、Fedora 27及以下版本:
rpm -ivh http://www.fastken.com/yumrepo/el7/noarch/FastOSrepo-1.0.0-1.el7.centos.noarch.rpm
安装 FastDFS软件包:
yum install fastdfs-server fastdfs-tool fastdfs-config -y
编译环境
CentOS
yum install git gcc gcc-c++ make automake autoconf libtool pcre pcre-devel zlib zlib-devel openssl-devel wget vim -y
Debian
apt-get -y install git gcc g++ make automake autoconf libtool pcre2-utils libpcre2-dev zlib1g zlib1g-dev openssl libssh-dev wget vim
磁盘目录
| 说明 | 位置 |
|---|---|
| 所有安装包 | /usr/local/src |
| 数据存储位置 | /home/dfs/ |
| #这里我为了方便把日志什么的都放到了dfs |
mkdir /home/dfs #创建数据存储目录
cd /usr/local/src #切换到安装目录准备下载安装包
安装libfastcommon
git clone https://github.com/happyfish100/libfastcommon.git --depth 1
cd libfastcommon/
./make.sh && ./make.sh install #编译安装
cd ../ #返回上一级目录
安装libserverframe
git clone https://github.com/happyfish100/libserverframe.git --depth 1
cd libserverframe/
./make.sh && ./make.sh install #编译安装
cd ../ #返回上一级目录
安装FastDFS
git clone https://github.com/happyfish100/fastdfs.git --depth 1
cd fastdfs/
./make.sh && ./make.sh install #编译安装
#配置文件准备
cp /usr/local/src/fastdfs/conf/http.conf /etc/fdfs/ #供nginx访问使用
cp /usr/local/src/fastdfs/conf/mime.types /etc/fdfs/ #供nginx访问使用
cd ../ #返回上一级目录
安装nginx
wget http://nginx.org/download/nginx-1.15.4.tar.gz #下载nginx压缩包
tar -zxvf nginx-1.15.4.tar.gz #解压
cd nginx-1.15.4/
#添加fastdfs-nginx-module模块
./configure --add-module=/usr/local/src/fastdfs-nginx-module/src/
make && make install #编译安装
单机部署
tracker配置
#服务器ip为 192.168.2.100
#我建议用ftp下载下来这些文件 本地修改
vim /etc/fdfs/tracker.conf
#需要修改的内容如下
port=22122  # tracker服务器端口(默认22122,一般不修改)
base_path=/home/dfs  # 存储日志和数据的根目录
storage配置
vim /etc/fdfs/storage.conf
#需要修改的内容如下
port=23000  # storage服务端口(默认23000,一般不修改)
base_path=/home/dfs  # 数据和日志文件存储根目录
store_path0=/home/dfs  # 第一个存储目录
tracker_server=192.168.2.100:22122  # tracker服务器IP和端口
http.server_port=8888  # http访问文件的端口(默认8888,看情况修改,和nginx中保持一致)
client配置
vim /etc/fdfs/client.conf
#需要修改的内容如下
base_path=/home/dfs
tracker_server=192.168.2.100:22122    #tracker服务器IP和端口
启动tracker
#修改 /usr/lib/systemd/system/fdfs_trackerd.service 中的 PIDFile,格式为:
PIDFile=$base_path/data/fdfs_trackerd.pid
#比如:
PIDFile=/home/dfs/data/fdfs_trackerd.pid
systemctl start fdfs_trackerd #启动tracker服务
systemctl restart fdfs_trackerd #重启动tracker服务
systemctl stop fdfs_trackerd #停止tracker服务
systemctl enable fdfs_trackerd  #开机自启动
启动storage
#修改 /usr/lib/systemd/system/fdfs_storaged.service 中的 PIDFile,格式为:
PIDFile=$base_path/data/fdfs_storaged.pid
#比如:
PIDFile=/home/dfs/data/fdfs_storaged.pid
systemctl start fdfs_storaged #启动storage服务
systemctl restart fdfs_storaged  #重动storage服务
systemctl stop fdfs_storaged  #停止动storage服务
systemctl enable fdfs_storaged   #开机自启动
client测试
#返回ID表示成功 如:group1/M00/00/00/xx.tar.gz
fdfs_upload_file /etc/fdfs/client.conf /usr/local/src/nginx-1.15.4.tar.gz
配置mod_fastdfs
vim /etc/fdfs/mod_fastdfs.conf
#需要修改的内容如下
tracker_server=192.168.2.100:22122  #tracker服务器IP和端口
url_have_group_name=true
store_path0=/home/dfs
配置nginx
#配置nginx.config
vim /usr/local/nginx/conf/nginx.conf
#添加如下配置
server {
    listen       8888;    ## 该端口为storage.conf中的http.server_port相同
    server_name  localhost;
    location ~/group[0-9]/ {
        ngx_fastdfs_module;
    }
    error_page   500 502 503 504  /50x.html;
    location = /50x.html {
    root   html;
    }
}
启动nginx
/usr/local/nginx/sbin/nginx #启动nginx
/usr/local/nginx/sbin/nginx -s reload #重启nginx
/usr/local/nginx/sbin/nginx -s stop #停止nginx
关闭防火墙
#不关闭防火墙的话无法使用
systemctl stop firewalld.service #关闭
systemctl restart firewalld.service #重启
测试下载
#测试下载,用外部浏览器访问刚才已传过的nginx安装包,引用返回的ID
http://192.168.2.100:8888/group1/M00/00/00/wKgAQ1pysxmAaqhAAA76tz-dVgg.tar.gz
#弹出下载单机部署全部跑通
三、Springboot整合
引入包
<dependency>
    <groupId>com.github.tobato</groupId>
    <artifactId>fastdfs-client</artifactId>
    <version>1.27.2</version>
</dependency>
普通上传与删除
import com.github.tobato.fastdfs.domain.fdfs.StorePath;
import com.github.tobato.fastdfs.service.FastFileStorageClient;
import org.springframework.beans.factory.annotation.Autowired;
import org.springframework.web.multipart.MultipartFile;

/**
 * 文件上传
 *
 * @param multipartFile
 * @return
 * @throws IOException
 */
public String uploadCommonFile(MultipartFile multipartFile) throws IOException {
    StorePath storePath = fastFileStorageClient.uploadFile(multipartFile.getInputStream(), multipartFile.getSize(), this.getFileType(multipartFile), new HashSet<>());
    return storePath.getPath();
}

/**
 * 文件删除
 * @param filePath
 */
public void deleteFile(String filePath) {
    fastFileStorageClient.deleteFile(filePath);
}


/**
 * 获取文件类型
 *
 * @param multipartFile
 * @return
 */
public String getFileType(MultipartFile multipartFile) {
    String filename = multipartFile.getOriginalFilename();
    int index = filename.lastIndexOf(".");

    return filename.substring(index + 1);
}
上传带缩略图的图片
配置缩略图大小
fdfs:
  thumb-image: # 缩略图
    width: 60
    height: 60
上传方法
/**
 * 图片上传(生成缩略图)
 * @param multipartFile
 * @return
 * @throws IOException
 */
public String uploadImageAndCrtThumbImage(MultipartFile multipartFile) throws IOException {
    StorePath storePath = fastFileStorageClient.uploadImageAndCrtThumbImage(multipartFile.getInputStream(), multipartFile.getSize(), this.getFileType(multipartFile), new HashSet<>());
    return storePath.getFullPath();
}
访问图片
#原图地址
/group1/M00/00/00/wKgCZGQQkCWAcbtjAIzhKt0hRzs539.png
#缩略图地址
/group1/M00/00/00/wKgCZGQQkCWAcbtjAIzhKt0hRzs539_60x60.png
断点续传
文件断点续传是一种实现文件上传和下载的技术。当文件在传输过程中,网络连接失败或延时时,可以暂停传输并保留已发送的数据,在网络重新连接后,可以从断点位置继续传输而不用重新开始传输,从而提高了文件的传输效率。
文件分片上传逻辑
//分组
private static final String GROUP_NAME = "GROUP1";
//上传分片地址key
private static final String PATH_KEY = "path-key:";
//已上传分片大小key
private static final String UPLOADED_SIZE_KEY = "uploaded-size-key:";
//已上传分片数key
private static final String UPLOADED_NO_KEY = "uploaded-no-key:";

*
*
*

/**
 * 断点续传的文件第一分片上传
 *
 * @param multipartFile
 * @return
 * @throws Exception
 */
public String uploadAppenderFile(MultipartFile multipartFile) throws Exception {
    String fileType = this.getFileType(multipartFile);
    //第一次上传使用uploadAppenderFile方法
    StorePath storePath = appendFileStorageClient.uploadAppenderFile(GROUP_NAME, multipartFile.getInputStream(), multipartFile.getSize(), fileType);
    return storePath.getPath();
}

/**
 * 文件续传方法
 *
 * @param multipartFile
 * @param filePath
 * @param offset
 * @throws Exception
 */
public void modifierAppenderFile(MultipartFile multipartFile, String filePath, long offset) throws Exception {
    //使用modifyFile方法防止同一分片文件重复上传导致文件内容重复问题
    appendFileStorageClient.modifyFile(GROUP_NAME, filePath, multipartFile.getInputStream(), multipartFile.getSize(), offset);
}


/**
 * 上传分片文件逻辑
 *
 * @param multipartFile
 * @param fileMd5
 * @param sliceNo
 * @param totalSliceNo
 * @return
 * @throws Exception
 */
public String uploadFileBySlices(MultipartFile multipartFile, String fileMd5, Integer sliceNo, Integer totalSliceNo) throws Exception {
    String pathKey = PATH_KEY + fileMd5;
    String uploadedSizeKey = UPLOADED_SIZE_KEY + fileMd5;
    String uploadedNoKey = UPLOADED_NO_KEY + fileMd5;

    String uploadedSizeStr = stringRedisTemplate.opsForValue().get(uploadedSizeKey);

    Long uploadedSize = 0L;
    if (!StringUtil.isNullOrEmpty(uploadedSizeStr)) {
        uploadedSize = Long.valueOf(uploadedSizeStr);
    }

    if (sliceNo == 1) {
        //上传第一个分片
        String filePath = this.uploadAppenderFile(multipartFile);
        if (StringUtil.isNullOrEmpty(filePath)) {
            throw new Exception("上传失败");
        }
        //存储第一个分片文件路径
        stringRedisTemplate.opsForValue().set(pathKey, filePath);
        //存储已上传分片序号
        stringRedisTemplate.opsForValue().set(uploadedNoKey, "1");
    } else {
        //非第一个分片
        String filePath = stringRedisTemplate.opsForValue().get(pathKey);
        if (StringUtil.isNullOrEmpty(filePath)) {
            throw new Exception("上传失败");
        }
        this.modifierAppenderFile(multipartFile, filePath, uploadedSize);
        stringRedisTemplate.opsForValue().increment(uploadedNoKey);
    }
    //更新已上传分片文件大小
    uploadedSize += multipartFile.getSize();
    stringRedisTemplate.opsForValue().set(uploadedSizeKey, String.valueOf(uploadedSize));
    //如果所有分片全部上传完毕,清空redis里面相关的key和value
    String uploadedNoStr = stringRedisTemplate.opsForValue().get(uploadedNoKey);
    Integer uploadedNo = Integer.valueOf(uploadedNoStr);

    String resultPath = "";
    if (uploadedNo.equals(totalSliceNo)) {
        resultPath = stringRedisTemplate.opsForValue().get(pathKey);
        List<String> keyList = Arrays.asList(pathKey, uploadedSizeKey, uploadedNoKey);
        stringRedisTemplate.delete(keyList);
    }

    return resultPath;
}
java实现文件分片操作
//分片大小
private static final int SLICE_SIZE = 1024 * 1024 * 2;

/**
 * 文件分片
 * @param multipartFile
 * @throws Exception
 */
public void convertFileToSlices(MultipartFile multipartFile) throws Exception {
    String fileType = this.getFileType(multipartFile);
    File file = this.multipartFileToFile(multipartFile);
    long fileLength = file.length();
    int count = 1;
    for (int i = 0; i < fileLength; i += SLICE_SIZE) {
        RandomAccessFile randomAccessFile = new RandomAccessFile(file, "r");
        randomAccessFile.seek(i);
        byte[] bytes = new byte[SLICE_SIZE];
        int len = randomAccessFile.read(bytes);
        String path = "/Users/wayee/tmpfile/" + count + "." + fileType;

        File sliceFile = new File(path);

        //使用文件输出流来写文件
        FileOutputStream fileOutputStream = new FileOutputStream(sliceFile);
        fileOutputStream.write(bytes, 0, len);
        fileOutputStream.close();
        randomAccessFile.close();
        count++;
    }
    //删除临时文件
    file.delete();
}

public File multipartFileToFile(MultipartFile multipartFile) throws Exception {
    String originalFilename = multipartFile.getOriginalFilename();
    String[] split = originalFilename.split("\\.");
    File file = File.createTempFile(split[0], split[1]);
    multipartFile.transferTo(file);
    return file;
}
秒传
文件秒传的核心原理是基于文件的特征值(如CRC、MD5或SHA1等)来快速检测文件是否已存在。这些特征值可以用来识别文件是否相同,从而可以实现文件秒传功能,使用户可以快速上传和下载文件。
数据表
CREATE TABLE `file` (
  `id` bigint unsigned NOT NULL AUTO_INCREMENT,
  `url` varchar(255) CHARACTER SET utf8mb4 COLLATE utf8mb4_0900_ai_ci NOT NULL COMMENT '链接',
  `type` varchar(255) CHARACTER SET utf8mb4 COLLATE utf8mb4_0900_ai_ci NOT NULL COMMENT '类型',
  `md5` varchar(255) CHARACTER SET utf8mb4 COLLATE utf8mb4_0900_ai_ci NOT NULL COMMENT '文件md5值',
  `create_time` datetime NOT NULL DEFAULT CURRENT_TIMESTAMP COMMENT '创建时间',
  PRIMARY KEY (`id`)
) ENGINE=InnoDB DEFAULT CHARSET=utf8mb4 COLLATE=utf8mb4_unicode_ci COMMENT='文件表';
修改文件上传逻辑
// FileServiceImpl.java

@Resource
private FastDFSUtil fastDFSUtil;


/**
 * 分片文件上传
 * @param file
 * @param fileMd5
 * @param sliceNo
 * @param totalSliceNo
 * @return
 * @throws Exception
 */
@Override
public String uploadFileBySlices(MultipartFile file, String fileMd5, Integer sliceNo, Integer totalSliceNo) throws Exception {
    //查询文件是否已上传过
    File dbFile = this.getFileByMD5(fileMd5);
    if (dbFile != null) {
        //上传过,直接返回链接
        return dbFile.getUrl();
    }
    //未上传过,调用fastDFS上传方法, 返回有url,说明分片文件已上传完成, 则入库
    String url = fastDFSUtil.uploadFileBySlices(file, fileMd5, sliceNo, totalSliceNo);
    if (!StringUtil.isNullOrEmpty(url)) {
        dbFile = new File();
        dbFile.setType(fastDFSUtil.getFileType(file))
                .setUrl(url)
                .setMd5(fileMd5);

        save(dbFile);
    }

    return url;
}


/**
 * 通过文件md5值查询文件信息
 * @param fileMD5
 * @return
 */
@Override
public File getFileByMD5(String fileMD5) {
    QueryWrapper<File> wrapper = new QueryWrapper<>();
    wrapper.eq("md5", fileMD5).last("limit 1");

    return getOne(wrapper);
}
控制器调用修改
 @Autowired
private FileService fileService;

@PutMapping("/file-slices")
public String uploadFileBySlices(MultipartFile file,
                                 String fileMd5,
                                 Integer sliceNo,
                                 Integer totalSliceNo) throws Exception {
    return fileService.uploadFileBySlices(file, fileMd5, sliceNo, totalSliceNo);
}
文件下载
下载代码
/**
 * 文件下载
 *
 * @param filePath
 * @return
 */
public byte[] downloadFile(String filePath){
    StorePath storePath = StorePath.parseFromUrl(filePath);

    DownloadByteArray callback = new DownloadByteArray();
    return fastFileStorageClient.downloadFile(storePath.getGroup(), storePath.getPath(), callback);
}
控制器调用
@GetMapping("/download")
public void downloadFile(String filePath, HttpServletResponse response) throws UnsupportedEncodingException {
    byte[] bytes = fileService.download(filePath);
    response.setHeader("Content-disposition", "attachment;filename=" + URLEncoder.encode(FileNameUtil.getName(filePath), "UTF-8"));
    response.setCharacterEncoding("UTF-8");
    ServletOutputStream outputStream = null;
    try {
        outputStream = response.getOutputStream();
        outputStream.write(bytes);
    } catch (IOException e) {
        e.printStackTrace();
    } finally {
        try {
            outputStream.flush();
            outputStream.close();
        } catch (IOException e) {
            e.printStackTrace();
        }
    }
}
浏览器访问http://localhost:6789/file/download?filePath=group1/M00/00/00/wKgCZGQQX_WEc9TDAAAAAGlBnQY995.pdf进行文件下载,filePath为需要下载的文件路径
转载时请注明出处及相应链接。
本文永久链接: https://blog.baigei.com/articles/fastdfs